United States · Pasta
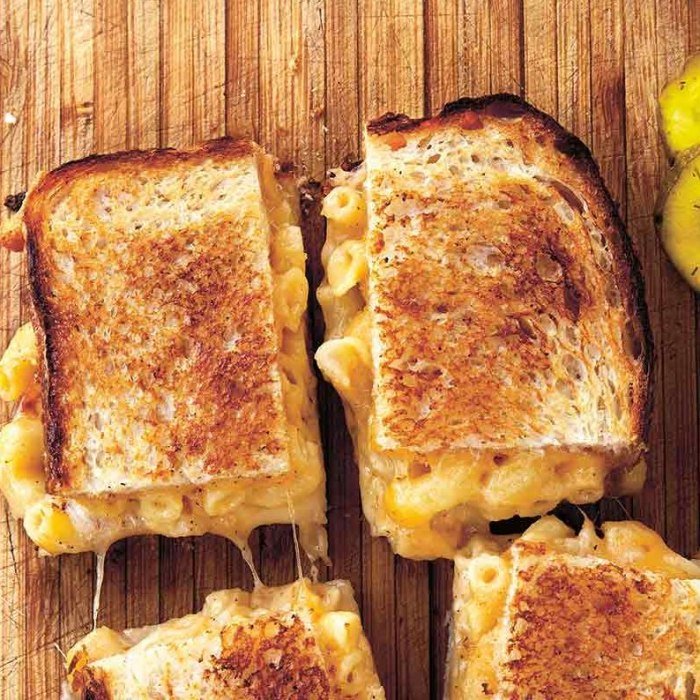
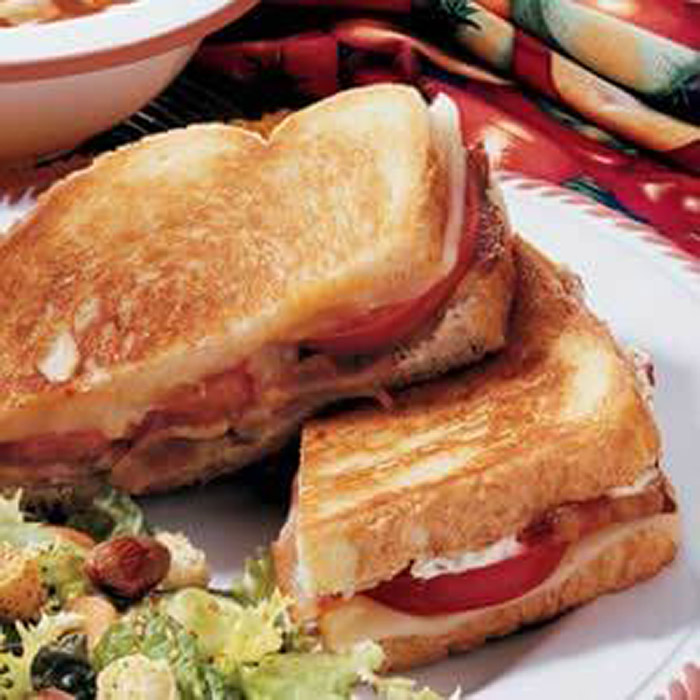
Grilled Mac and Cheese Sandwich
About this recipe
This recipe comes from a regional cooking tradition that draws on its own pantry, technique, and culinary history. The full editorial context for this cuisine is something we're still developing; the scaling and conversion tools above work the same regardless of origin.
As a pasta dish, Grilled Mac and Cheese Sandwich relies on the interplay of sauce, pasta shape, and the small science of pasta water — the starchy cooking liquid that thins the sauce and helps it cling. Two minutes of pasta-water finishing changes most dishes.
Use the scaler above to set the number of servings you actually want to cook — quantities resize with culinary fractions, units promote sensibly (three teaspoons become a tablespoon), and the result reads like the recipe was written for your table.
Recipe data is sourced from TheMealDB's open community database; ScaleRecipe handles the curation, the scaling math, the editorial commentary, and the conversion utilities woven into each page.
Translate this recipe
Reading in English
Listen to this recipe
No matching voice on this device
Method
- Make the mac and cheese
- 1. Bring a medium saucepan of generously salted water (you want it to taste like seawater) to a boil. Add the pasta and cook, stirring occasionally, until al dente, 8 to 10 minutes, or according to the package directions. The pasta should be tender but still chewy.
- 2. While the pasta is cooking, in a small bowl, whisk together the flour, mustard powder, garlic powder, salt, black pepper, and cayenne pepper.
- 3. Drain the pasta in a colander. Place the empty pasta pan (no need to wash it) over low heat and add the butter. When the butter has melted, whisk in the flour mixture and continue to cook, whisking frequently, until the mixture is beginning to brown and has a pleasant, nutty aroma, about 1 minute. Watch carefully so it does not scorch on the bottom of the pan.
- 4. Slowly whisk the milk and cream into the flour mixture until everything is really well combined. Cook, whisking constantly, until the sauce is heated through and just begins to thicken, about 2 minutes. Remove from the heat. Gradually add the cheese while stirring constantly with a wooden spoon or silicone spatula and keep stirring until the cheese has melted into the sauce. Then stir in the drained cooked pasta.
- 5. Line a 9-by-13-inch (23-by-33-centimeter) rimmed baking sheet with parchment paper or aluminum foil. Coat the paper or foil with nonstick cooking spray or slick it with butter. Pour the warm mac and cheese onto the prepared baking sheet and spread it evenly with a spatula. Coat another piece of parchment paper with cooking spray or butter and place it, oiled or buttered side down, directly on the surface of the mac and cheese. Refrigerate until cool and firm, about 1 hour.
- Make the grilled cheese
- 6. Heat a large cast-iron or nonstick skillet over medium-low heat.
- 7. In a small bowl, stir together the 4 tablespoons (55 grams) butter and garlic powder until well blended.
- 8. Remove the mac and cheese from the refrigerator and peel off the top layer of parchment paper. Carefully cut into 8 equal pieces. Each piece will make 1 grilled mac and cheese sandwich. (You can stash each individual portion in a double layer of resealable plastic bags and refrigerate for up to 3 days or freeze it for up to 1 month.)
- 9. Spread 3/4 teaspoon garlic butter on one side of each bread slice. Place half of the slices, buttered-side down, on a clean cutting board. Top each with one slice of Cheddar, then 1 piece of the mac and cheese. (Transfer from the baking sheet by scooting your hand or a spatula under each piece of mac and cheese and then flipping it over onto a sandwich.) Place 1 slice of Jack on top of each. Finish with the remaining bread slices, buttered-side up.
- 10. Using a wide spatula, place as many sandwiches in the pan as will fit without crowding it. Cover and cook until the bottoms are nicely browned, about 4 minutes. Turn and cook until the second sides are browned, the cheese is melted, and the mac and cheese is heated through, about 4 minutes more.
- 11. Repeat with the remaining ingredients. Cut the sandwiches in half, if desired, and serve.
Cooking notes
Pasta scales beautifully — water and salt should track the dry weight; sauce can be reduced slightly if you scale up beyond a single pan.
For volume-to-weight conversions of any ingredient — flour, sugar, butter, salts — use the ingredient converter. To translate the recipe's oven temperature between °C, °F and gas mark, see the temperature converter.
When you scale this recipe up or down, remember that cooking time does not scale linearly. A doubled cake takes longer, but not twice as long; a doubled soup takes roughly twice as long. The cooking-time guide gives sensible starting estimates by dish geometry.
Scaling notes
Scaling Grilled Mac and Cheese Sandwich
Grilled Mac and Cheese Sandwich is written for around four servings as it stands on this page — scaling it up for a party or down for a meal-for-one is the small math problem most home cooks face every week. Here's how this particular dish responds to scaling, what changes linearly, and what doesn't.
Pasta is among the easiest dishes to scale: both the water volume and the boil time stay almost constant. Doubling Grilled Mac and Cheese Sandwich means doubling the sauce (linear) while keeping the pasta-water salt at roughly 1 % of the water's weight regardless of batch size. The most common scaling mistake is over-salting the sauce because the recipe writer assumed a smaller starting batch.
When you scale the flour in this recipe, weigh it in grams if you can — a cup of flour can weigh anywhere from 113 g to 150 g depending on how you measure. The ScaleRecipe ingredient converter uses the King Arthur Baking reference of 120 g/cup for all-purpose flour, which is the same standard most modern baking books assume.
Butter is one of the easier ingredients to scale because it's sold in standardised sticks: 1 US stick = 8 tablespoons = ½ cup = 113 g. Any fractional scaling lines up neatly on a kitchen scale, and grocery-store butter packaging is already pre-marked in tablespoon increments along the wrapper.
Skip the math entirely — ScaleRecipe's scaler rewrites every ingredient line above with proper culinary fractions and smart unit promotion the moment you change the serving count. Open the scaler →
Beyond the recipe
Substitutions & make-ahead — Grilled Mac and Cheese Sandwich
Two things home cooks ask about most when they're outside the recipe's exact assumptions: what swaps work for which ingredients, and how the dish behaves when you make it ahead. Both depend on what Grilled Mac and Cheese Sandwich is doing structurally — here's the practical version.
Substitution ideas
Butter
For sautéing or browning, equal-weight olive oil or a neutral oil works directly. For baking, equal-weight coconut oil (melted, then chilled to the same softness the recipe expects) gives a buttery richness; a quality vegan butter brick is the structural match for cookies and pastries where firmness matters.
Heavy cream
For sauces and soups: evaporated milk + 1 tbsp butter per cup approximates the body and richness. For whipping, the solid layer from chilled full-fat canned coconut milk whips into stable peaks (the flavour is coconut-forward; works in tropical desserts, less so in vanilla applications).
Dairy milk
Unsweetened soy milk substitutes 1:1 in custards and baked goods (the protein content matches). Oat milk gives a creamier mouthfeel for soups and coffee drinks. Almond milk works for lighter applications. Skip coconut milk in savoury recipes unless the dish calls for it — the flavour is unmistakable.
For weight-based swaps and arbitrary quantities, the ingredient density converter and the cup-to-grams chart cover most pantry staples.
Make-ahead and storage
Pasta dishes split into two halves for make-ahead purposes. The sauce in Grilled Mac and Cheese Sandwich can be made up to 3 days in advance and refrigerated, then warmed gently while you boil fresh pasta. Cooked pasta itself doesn't store well — it absorbs water and turns starchy. If you must store the dish assembled, undercook the pasta by about a minute on day one so the reheat lands at al dente. Cheese-based sauces are best dressed at the last minute.
Recipe video
Grilled Mac and Cheese Sandwich
Keep cooking
More pasta recipes

Cooking aids
Tools to use while you cook this.
Each opens in a new tab so the timer keeps running. The math is auditable on the guide page below each converter, with worked examples and where the numbers come from.
Volume
Tablespoons, teaspoons, cups, ml, fluid ounces — every culinary volume unit, with US/metric/imperial cups handled distinctly.
OpenWeight
Grams, ounces, pounds, kilograms — exact for any ingredient, plus the volume-to-weight conversions for ~40 pantry staples.
OpenTemperature
Fahrenheit, Celsius, gas mark — translate any oven temperature, with notes on conventional vs convection.
OpenCooking time
The cube-root rule for scaling up, the differences between meat / cake / soup geometry, and sensible starting estimates.
OpenPan size
9-inch round vs 8-inch square vs 13×9. The math is surface area, not diameter — and the converter shows you both.
OpenLength
Inches and centimetres — for when a recipe says “cut into 1-inch pieces” and your ruler is metric.
OpenIngredient density
A cup of flour weighs 120 g; a cup of honey weighs 340. The full table of ~40 staples, with sources.
OpenOpen in main scaler
Edit the recipe text, scale by serving count, and copy the result. Same parser as the in-page scaler, more room to work.
OpenFrom the journal
Original essays on the small details.
The why behind the technique — original writing on the ingredient and equipment choices that separate a good cook from a frustrated one.
Reading a recipe like a chef
The 30-or-so recipe terms that show up most often, decoded
Read essayMay 4, 2026
Cooking for one — scaling principles
The math, the practical realities, and the recipes designed for one from the start
Read essayMay 4, 2026
How long do leftovers actually last?
Beyond the USDA's 3–4 days: the variables that actually determine the safe window
Read essayMay 4, 2026
Go deeper
Where this recipe sits in the wider tradition.
Each guide below is a real essay on the cuisine or the category — pillars, staples, techniques worth learning — paired with a curated grid of recipes filed under it.
Keep exploring
Ready to cook?
Scale it to your table, then get into the kitchen.
Send this recipe to the main scaler for further editing, or jump straight into Cook Mode for a hands-free walk-through with timers running.